Directives in Angular is a js class, which is declared as @directive. We have 3 directives in Angular. The directives are listed below −
Component Directives
These form the main class having details of how the component should be processed, instantiated and used at runtime.
Structural Directives
A structure directive basically deals with manipulating the dom elements. Structural directives have a * sign before the directive. For example, *ngIf and *ngFor.
Attribute Directives
Attribute directives deal with changing the look and behavior of the dom element. You can create your own directives as explained in the below section.
How to Create Custom Directives?
In this section, we will discuss about Custom Directives to be used in components. Custom directives are created by us and are not standard.
Let us see how to create the custom directive. We will create the directive using the command line. The command to create the directive using the command line is as follows −
ng g directive nameofthedirective
e.g
ng g directive changeText
It appears in the command line as given in the below code −
C:\projectA7\angular7-app>ng g directive changeText
CREATE src/app/change-text.directive.spec.ts (241 bytes)
CREATE src/app/change-text.directive.ts (149 bytes)
UPDATE src/app/app.module.ts (565 bytes)
The above files, i.e., change-text.directive.spec.ts and change-text.directive.ts get created and the app.module.ts file is updated.
app.module.ts
import { BrowserModule } from'@angular/platform-browser';
import { NgModule } from '@angular/core';
import { AppRoutingModule } from './app-routing.module';
import { AppComponent } from './app.component';
import { NewCmpComponent } from'./new-cmp/new-cmp.component';
import { ChangeTextDirective } from './change-text.directive';

@NgModule({
   declarations: [
      AppComponent,
      NewCmpComponent,
      ChangeTextDirective
   ],
   imports: [
      BrowserModule,
      AppRoutingModule
   ],
   providers: [],
   bootstrap: [AppComponent]
})
export class AppModule { }
The ChangeTextDirective class is included in the declarations in the above file. The class is also imported from the file given below −
change-text.directive
import { Directive } from '@angular/core';

@Directive({
   selector: '[changeText]'
})
export class ChangeTextDirective {
   constructor() { }
}
The above file has a directive and it also has a selector property. Whatever we define in the selector, the same has to match in the view, where we assign the custom directive.
In the app.component.html view, let us add the directive as follows −
<!--The content below is only a placeholder and can be replaced.-->
<div style = "text-align:center">
   <h1> Welcome to {{title}}. </h1>
</div>
<div style = "text-align:center">
   <span changeText >Welcome to {{title}}.</span>
</div>
We will write the changes in change-text.directive.ts file as follows −
change-text.directive.ts
import { Directive, ElementRef} from '@angular/core';
@Directive({
   selector: '[changeText]'
})
export class ChangeTextDirective {
   constructor(Element: ElementRef) {
      console.log(Element);
      Element.nativeElement.innerText = "Text is changed by changeText Directive.";
   }
}
In the above file, there is a class called ChangeTextDirective and a constructor, which takes the element of type ElementRef, which is mandatory. The element has all the details to which the Change Text directive is applied.
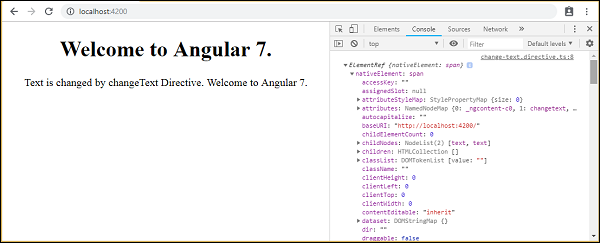
We have added the console.log element. The output of the same can be seen in the browser console. The text of the element is also changed as shown above.
Now, the browser will show the following −

The details of the element on which the directive selector is given in the console. Since we have added the changeText directive to a span tag, the details of the span element is displayed.


No comments:
Post a Comment